Sunday, January 28, 2007

Refrigerator / Freezer Upgrade

The box for the refrigerator and freezer compartments is very large, and the back wall is inaccessible without climbing into the box itself. During commissioning, we added a Frigoboat keel-cooled system, and we have been extremely happy with it. This system circulates the refrigerant to a heat exchanger plate attached to the hull and in contact with seawater. There are no fans with this system, so it is very quiet, and the heat does not build up in the compartment where the compressor is mounted.


Our goal has been to keep the freezer side of the split box at about 0 degrees and the refrigerator side at about 40 degrees. The evaporator plate is mounted in the freezer compartment. The refrigerator side is cooled entirely by spillover from the freezer side. We concluded after operating for a couple of seasons that the box insulation was insufficient, requiring the compressor to run more often. Many other Island Packet owners have experienced the same in many different models. It is my understanding that the manufacturing process on newer models has been changed to minimize the incidence of voids in the insulation. We found a site that sells components for refrigeration systems, including box construction materials. Since the box was oversized, we decided we could add insulation to the interior without a significant loss of space. We also did not want to remove or alter the countertop in any way. This meant working within the box, which would prove very challenging. We ordered 1-inch-thick vacuum panels, which were custom-made to our specifications. The box is an irregular shape, so all panels have some angles. They also had to be sized to fit through the access opening. The vacuum panels must be handled carefully and well-protected, as any puncture will greatly reduce their effectiveness. The panels have an R-value = 28. To protect the panels and provide a new interior surface, we ordered sheets of protruded fiberglass. We then cut pieces to form a new interior. Construction then involved gluing the vacuum panels in place using insulation foam, and then gluing the fiberglass sheet over the panels, and finally using an epoxy putty to seal all joints. The insulated divider between the freezer and refrigerator compartments was removed, cut down on each side to the new dimensions, and then refitted. While it was out, we added an electric spillover fan, which is controlled by its own thermostat.


One last upgrade was to add an electronic module to control the compressor. The objective is to run the compressor at the slowest possible speed. It is more efficient to run it slower for longer periods of time. Depending on the demands, this module adjusts the compressor speed to achieve this objective as much as possible. It also has a manual override that can be used to cool faster, such as when restocking.

After one season with the upgrade, we are very happy with the result. We probably did not need the spillover fan, and subsequently, we added a butterfly value to adjust (slow down) the air flow. Once cooled down, we usually close the butterfly valve almost completely.

Saturday, January 13, 2007

Survival

Our first and most important step toward survival is preparation, planning, and giving full consideration to the weather and conditions. That aside, there are always the unknown factors or circumstances. For this, we have our survival equipment and plans. These we view much like insurance. We need it, but we hope we never have to use it. Also, like insurance, this equipment provides peace of mind to have it available.

EPIRB – this device is registered with the FCC. If we activate it, it will send a signal that reports our position from an internal GPS and identifies us as the sender. In all likelihood, either our son Daniel or our daughter Pamela will be contacted, as they are registered as our contacts. Once they confirm we are, in fact, at sea, a search team will be deployed to our reported location. Given the swiftness of the potential recovery by activating the EPIRB, we consider this a very important piece of equipment.

Life Raft – We have a Winslow 4-person model 40SLO, which weighs about 41 pounds. We had it vacuum-packed so it can last for 3 years before inspection and repacking, rather than the normal annual inspection. Some supplies packed inside the raft are dated and are then replaced during inspection.

Ditch Bag – this bag is stowed just under the companionway so that it can be easily grabbed from the cockpit, but it is actually stored inside the cabin. The bag includes essentials for survival and recovery. It includes the EPIRB, distress signals, the first-aid kit, additional food and water, and important papers, among other items. A handheld GPS and VHF radio are nearby and would be put in the bag if possible.

There are a couple of ways to stow a life raft. Some are stowed in a canister mounted on the deck or the stern rail. We seriously considered mounting a canister on the cabin roof, but in the end rejected the idea. The canister benefits from not consuming valuable storage space, but it must be securely attached to reduce the risk of being washed overboard, and it subjects the raft to more of the weather, such as the hot sun. We decided on the other available option: stowing it in a protected space, which in our case is a cockpit locker. This has the advantage of protecting the raft from the elements and also being readily available from the cockpit. The major disadvantage is giving up prime storage space. As a compromise, we constructed a shelf for the life raft, which is hinged to fold up out of the way when working in the locker and also is on a slide so the life raft can be moved directly under the locker lid, ready to be lifted and deployed.

Thursday, November 23, 2006

Setting a Date

This has actually been the hardest decision for us to make. It is a balancing act between saving for retirement and leaving soon enough to be reasonably fit and in good health. The financial advisers warn those contemplating early retirement that medical insurance until Medicare kicks in at the normal retirement age is extremely expensive.

Neither of us has retiree medical insurance. Linda lost hers when her employer totally revoked the benefit and, in its place, added a small amount to her 401(k). Norm lost his retiree medical insurance in one of the many corporate reshuffles that he otherwise survived. Norm could work just another year plus and again qualify for retiree medical insurance, but that would delay our departure by two years, since we could not leave until the fall of the following year. It sounds enticing, but the trend has been to shift more and more of the premium burden to the retiree, and we don't have confidence that the program will not be dropped in the future.

In the end, we decided not to wait for this benefit and to struggle through the gap with individual insurance plans. 

So then what happens in 2007? Norm will reach the 30th anniversary mark with his employer. This is special because he can then draw a full unreduced pension. The timing could not be better. His anniversary is in August, and we want to leave in September.

Linda is already retired. She retired when we moved from Ohio to Massachusetts. She no longer had a career as such, but a job with little opportunity for advancement. During one of the campaign periods for an increase in the local school levy, they restricted school buses to the state minimum of outside two miles from school. We lived just within a two-mile radius, so Linda gave up her position in the Trust Department and accepted a part-time bank teller position with the same employer to be closer to home and have more flexible work hours. Within a couple of weeks, bus service was resumed, but the change had been made, and she was never considered for a position in the Trust Department again. Over time, she was assigned to branches farther and farther from home. It was an easy decision to retire when relocation provided another good excuse.

Norm is not so anxious to retire as he is to pursue our dream while we can. For the last 10 years, he has been a consultant configuring SAP software. This is project work, which, by nature, is very demanding, with long hours and a high level of travel. It is also extremely rewarding as the teams, conditions, and challenges are constantly changing. If we did not have this dream, he would not even think of early retirement.

Thursday, November 16, 2006

Boat Tour – Guest Cabin

The guest cabin is on the port quarter. This features a double berth which extends under the cockpit. We have changed this area significantly from the original design. Island Packet included a small sink in a slide-out drawer under a lift-up top in the cabinet. While interesting and functional, this just wasn’t a practical use of the space for us.

We removed the sink, water supply, and drain lines. We re-routed the hot water line to the cockpit shower, which had previously been cold-water only. This involved adding a mixer in the cockpit to regulate the water temperature. We converted the sink drain through-hull to use for the generator exhaust water. We then built a teak desk that slides out just as the sink did, and it also has leaves that fold out to create a reasonably sized work area. The desk was designed primarily as a station for the laptop computer. When the laptop is not in use, it is stored safely in the desk compartment.


We finally added a chair for the desk. This chair uses a pedestal system that allows for easy removal, leaving a plate flush with the cabin sole. While guests are aboard, the chair is stored at the helm in the cockpit. 

This compartment also includes a hanging locker. While rarely used as such, this space is used to store a toolbox and a wet/dry vacuum, both of which are too bulky for other storage areas but are now readily accessible.

Sunday, November 12, 2006

Generator Installation


The biggest project we undertook was installing a generator. We get many of our ideas from the Island Packet Discussion List, a forum for exchanging ideas via email hosted by Sailnet.com, and from Islandpacketphotos.com, a site hosted by Hayden Cochran, also an IP owner. We had been searching for a small generator at a reasonable cost. We were drawn to a 4.2kw generator made by Entec West. The size and price were right, and they are very supportive of owner installation and maintenance. We made the decision and traveled to the Annapolis Boat Show to see the model in person and place our order. We immediately started creating a space for it on Ariel. We decided the best location was directly under the helm. This is on the centerline, which we felt was important since the generator with sound enclosure weighs 234 pounds.                                                                                                                                                                                                                               


This space was already occupied by the hot water heater. We took a radical approach and moved the hot water heater all the way forward to a space under the berth. It just fit through the opening. This meant re-routing the water lines and running electricity to the water heater at the new location. Normally, the water is heated from one of two sources. While the engine is running, the engine cooling system will provide heat to warm the water through a heat exchanger. The second source is 120-volt AC power, provided by shore power or a generator. The space now occupied by the hot water heater is not readily accessible, as it is under the mattress, so we felt it was an easy trade-off.

The generator needed a solid base, so during the winter, a base was constructed to beef up the existing platform that previously supported the hot water heater.

Most of the work during the installation was focused on the supporting services. A new through-hull was installed to provide cooling water. Just after the through-hull, a new strainer was installed to filter out any debris that may be drawn in. A new fuel line was required and well as a fuel return. We designed a fuel system that included a fuel filter identical to the one used to support the main diesel engine. We also designed a manifold that permits the main engine or generator to use either fuel filter. If one fuel filter becomes clogged, we can immediately switch to the other, continue on, and then change the dirty fuel filter later.  We also had to install the cables from the starter battery to the starter motor. The generator shares the same battery for starting with the main engine. We added the control panel, which is mounted in the cockpit. This particular one will shut down the generator if problems are detected, such as overheating or low oil pressure.

We added the electrical wiring, which required a set of circuit breakers to prevent sourcing 120-voltt AC from shore power and the generator at the same time. We added the exhaust system, which required routing the exhaust through a water lift muffler and then to the transom, where a new exhaust port was added. Marine engines mix the cooling water and the exhaust. We knew this would create a splashing sound, but decided to try the system one season before deciding whether we needed an air-water separator. The air-water separator does exactly what the name implies. It separates the air and water and then routes the exhaust air to the transom exhaust port and sends the water to an underwater through-hull. The following year, we added this feature. While the generator has its own very good sound enclosure, we decided to add another layer of sound insulation to the area where the generator would be installed. Finally, we lowered the generator into place, using a chain fall attached to the spare halyard. This operation went smoothly, and after making the final connections and bleeding the fuel lines, it started quite readily. We have been very pleased ever since and are very satisfied with the sound level. The unit produces 35 amperes, which can power everything we have on board, but not all at once. We added an amperage gauge at the electrical panels to monitor our consumption and the generator load. Access to the generator for maintenance is through the starboard cockpit locker. The sound enclosure is removed as shown in the first photo to provide access.

Friday, November 03, 2006

Tucked Away for Winter


Ariel is now ready for its final winter in the Northeast. It is a required ritual in the north to prepare for winter and, of course, in the spring to re-commission for another season. There is actually quite a list of tasks, all of which are extremely important to avoid damage from freezing and severe weather. We had a custom cover made in the first year we had Ariel. In addition to keeping the freezing rain and snow off, it also protects it from the sun and from boat yard hazards such as paint overspray. We remove all items that could freeze; many of these are items from the head and from the galley. We put antifreeze (pink pop) in all of the systems. The engine, generator, and air conditioning units all use seawater for cooling. This seawater has to be replaced with antifreeze. The water tank and the hot water heater are drained, and the antifreeze is run through all of the fresh water lines. This antifreeze is non-toxic, so in the spring, the lines are flushed and are ready for normal use. All other systems are also winterized in the same fashion. These include the head, wash down system, and sump pumps. We then open compartments and place cushions on end to allow air circulation. On the exterior, we start maintenance at the bottom. In the spring, we will put on new coats of bottom paint. This is paint with a high copper content, which helps prevent marine growth. The propeller (Autoprop) is greased to force out any water that may be inside the hub. We scrape the few barnacles that have accumulated. Barnacles attach to any metal surface, so the prop will have several. Once all of this is done, Ariel is pretty safe left alone. We check on things about once a month during the winter. This gives us a chance to see if any water has accumulated in the bilge, and if not frozen, it is removed. We also run the battery charger to keep the batteries left aboard topped off.

Those are the tedious details of putting Ariel away for another winter. But this year is very special for us, as this is the last time we will go through this process. The alternative to all of the above is to take the boat to a warmer climate. So stay tuned, as next year we will do just that. Now we have the long winter to endure. We will turn our attention toward cruise planning and start putting some more details around the dream.

Saturday, October 28, 2006

Boat Tour - Main Cabin


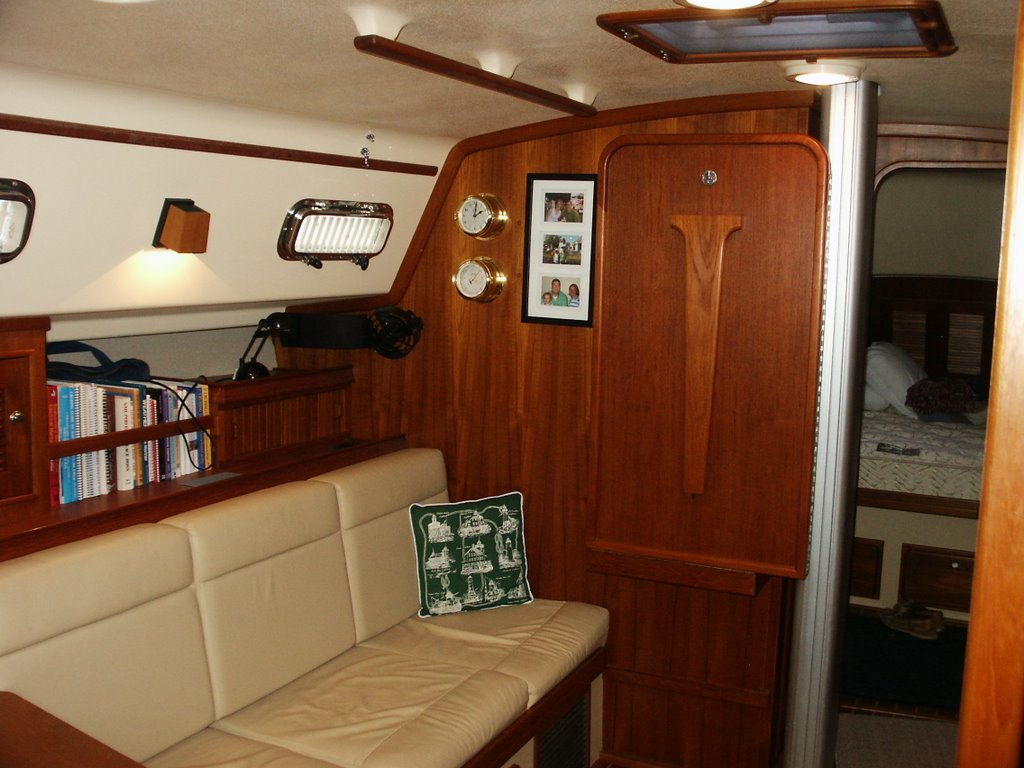
The main cabin is both our living and dining rooms. Much of our storage space is behind and under the settees. The locker on the starboard side is where we keep our foul-weather gear and our coats. In front of the locker is our laundry bag. This is one of the trade-offs, as there is just not enough space for this in any other compartment.  We have two air conditioning units, under the forward-most portion of the settees on both the port and starboard sides.


The dining table is shown below in both the up and down positions. This is a wonderful design, as it is so easy to put away when not in use, which really opens up the space. For the two of us, we use it as shown. When we have guests aboard, the table folds open again to double in size. The navigation station and chart table are just visible in the picture with the dining table in the down position. This area really doesn't get much use as we have our instruments and radar/chartplotter at the helm. Without a seat back, this area just isn't very comfortable to work at for more than a few minutes. We have solved this by adding a work desk in the guest cabin, which we will review in a future post.


Saturday, October 21, 2006

Boat Tour - Galley


The galley features a three-burner propane stove with oven, a double stainless steel sink with hot and cold water, a microwave oven, and a large refrigerator/freezer. This is a roomy space with good lighting and good ventilation. Visible in the foreground is a fold-down counter which, when up, provides additional counter space, which is at a premium. The cabin sole (floor) in this area is fiberglass and gelcoat, which makes for easy cleaning. This space is at the base of the companionway (entrance), so it is also a good area to remove wet clothing. The refrigerator/freezer box is split about 1/3 freezer and 2/3 refrigerator. We keep the freezer at 0 degrees and the refrigerator at about 40 degrees. The refrigeration unit uses seawater for cooling and does not have a fan, so it is very quiet and very efficient. One of the improvement projects we undertook was adding insulation to the interior of the box. We added custom-made vacuum panels and then a new fiberglass covering. We lost a little space, but the gain in electrical efficiency was well worth it. We keep the most frequently used items in the galley area, but food supplies are also stored in the main cabin. One nice feature, not visible in these pictures, is that the waste basket is mounted in a roll-out drawer under the galley sink. Since we have an inverter (which converts 12V battery power to normal household 110V), we use some regular appliances such as a toaster, blender, and coffee maker.


Tuesday, October 10, 2006

Boat Tour - Forward Berth


This is our cabin. It is quite roomy. The bed at its widest point is between a queen and a king. Linda makes custom sheets beginning with a king-size flat. She adds a pocket for a drawstring to tighten the sheet under the mattress. Forward, the mattress sides follow the shape of the hull, so without some way to tighten and hold the sheet, it would continuously slip off.  Just forward beyond the pillows is access to the anchor locker, where the anchor chain and rode are stored. The mattress platform is hinged in the middle, and the lower half of the bed lifts to access a large compartment we use for linens. There are also drawers under the bed and cabinets on both sides, hidden in this camera angle. There are shelves on both sides and additional lights and fans above the pillows. There is one opening hatch overhead and two port lights with shades.

Wednesday, September 20, 2006

Introduction

"Twenty years from now, you will be more disappointed by the things you didn't do than by the ones you did do. So throw off the bowlines. Sail away from the safe harbor. Catch the trade winds in your sails. Explore. Dream. Discover."    Mark Twain


We are Norm and Linda Karns.  We are in the final year of preparations to move aboard our sailboat, Ariel. It is hard to know exactly when we decided to begin our retirement years exploring the East Coast of the United States and the Caribbean on a sailboat. It was an evolutionary process over a period of years.

We have been sailing for about 15 years. We began our sailing experience in Sandusky, Ohio, on Lake Erie. Later, we relocated to Massachusetts and, for the past several years, have made Portsmouth, Rhode Island, our home port.

One of the most difficult challenges was finding the right boat for us. We read all the sailing magazines, visited the boat shows, visited many boat yards, and had many discussions with other boaters, and became very confused by all the options. Finally, we made a list of the features we wanted in a boat for the type of cruising we had planned. Once we did that, the sailboats made by Island Packet Yachts became the very obvious choice for us.

In 1999, Island Packet introduced the IP380. Even before the first hull was shown at the Annapolis boat show, we knew this was the boat for us. In 2001, we purchased what would later be named Ariel. Ariel is hull number 103. Since then, we have been equipping and preparing Ariel for the day we will move aboard.


Ariel Christening (still at dealer's lot)

Delivery Day